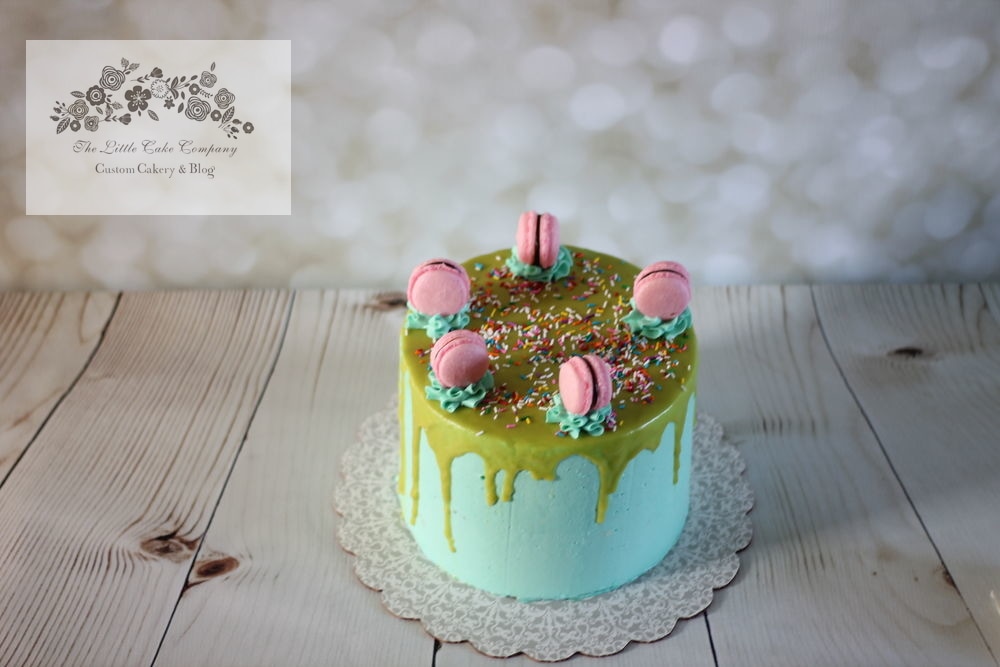
If you have ever attempted to make one yourself or even searched the internet for the best method, you will have found that there are hundreds of different recipes and methods to get the perfect drip cake. This is my tried and true approach:
Recipe: 100g chocolate or candy melts 100ml Double cream 2 Tablespoons Glucose syrup **NOTE: multiply up this recipe as required; I prefer to use weight for this recipe because candy melts and chopped chocolate do not measure as precise in cups. Method:
0 Comments
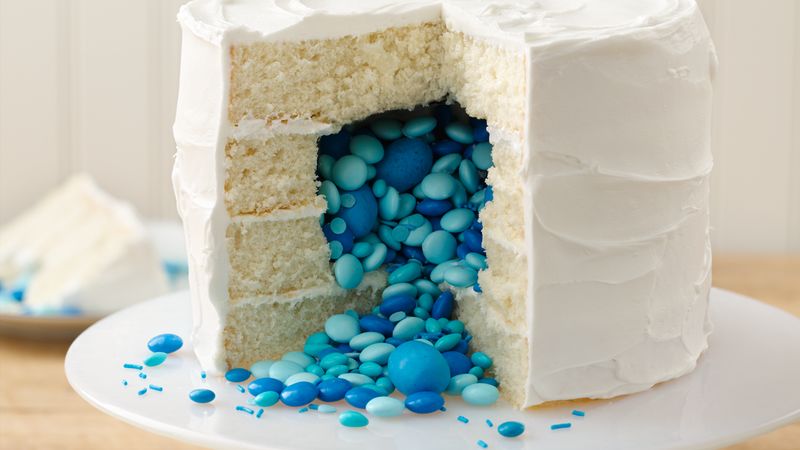
Making gender reveal cakes has always been one of my most favorite cakes to make. I always felt like it was such an honor to be the first to know such important news. It's also one of the more stressful cakes to make, because you have to get it right!
As some of my followers know I am pregnant with our first child. Which we are absolutely over the moon about; its the biggest blessing I could have ever hopped for and I was hoping we would be able to have a gender reveal cake of our own. So we decided to do one for our Mother's and family for Mother's Day. My husband and I already know the gender, but thought it would be fun to so something special, and something that represents our unique personalities in how we revealed our little one's gender to our friends and family. So we settled on doing a gender reveal cake for our families and my husband is going to our local gun range to shoot at exploding targets (which will be full of our gender colour) and film it for a "Facebook Reveal". So in honor of our gender reveal, I thought I would show my followers how to do a photo tutorial of how to make your own gender reveal cake at home. As much as I love making my customers beautiful gender reveal cakes; it's not always feasible, now you can make a quick and easy homemade version! Step One:
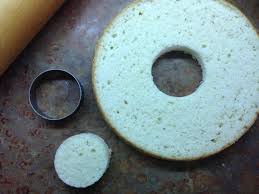
Step Three: Take a round cookie cutter and cut a hole in the middle of all your cake layers Except for the top and bottom cake layers.
Step Four: Stack and fill your layers with your favorite homemade buttercream; making sure to leave that middle hole free of buttercream.
Step Five: Fill the centre of the cake with Pink or Blue candies.
Step Six: Place the top layer on the cake and cover with a layer of your icing and decorate!
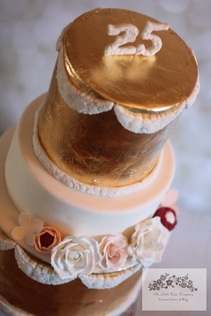

Recently a question came up where someone was wondering how to gold leaf a cake, and weather or not is was necessary to use 'edible gold leaf' or just regular old gold leaf available at most crafting stores; so I thought I would take this to the blog to answer this question for anyone wanting to create a gold leaf look on a cake.
Yes; you absolutely want to make sure you use edible gold leaf on any cake, it is completely different from the leaf bought at most craft and hobby stores and they are absolutely not interchangeable. The other question is where can cake decorators in Canada get this? It is particularly hard to come by in Canada, as is most cake decorating products. The cheapest and best quality I have found is on Amazon.ca (see the above link); these are the XL sized sheets and they are amazing. They adhere easily with a bit of pipping gel and you are good to go; you can even adhere decorations on top of the gold leaf (as I did with the cake in the photo). Its a simple, yet pricey way to add a big wow factor to your cakes! 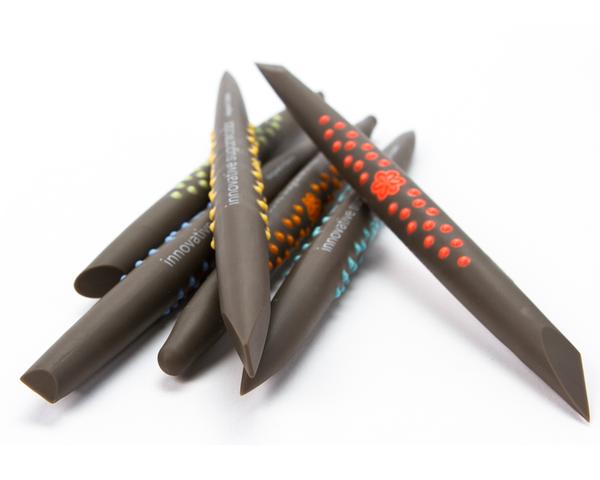
I recently ordered my very first set of Sugar Shapers by Innovative Sugarworks a few months ago, and they are nothing short of amazing. They come in both soft and hard tip; and I pretty much use them for everything. They are targeted to those who do a lot of molded figures; but they are universal in my opinion; and I have found they are amazing for applying sugar lace as well as getting separation between petals on my sugar flowers.
|
Categories
All
AuthorI have been caking for just about three years now and have learned so much. Through this blog I am hoping to inspire and share my passion for the artistry of cake design. Archives
February 2018
|

 RSS Feed
